Mostrando entradas con la etiqueta reset. Mostrar todas las entradas

jueves, 3 de julio de 2014

How to reset the page counter on canon pixma MP190 printers

The canon pixma mp190 printers are multifunction models created for home and small business use. They have good overall functioning and they’re very compat. Also, this device can scan, copy and print.

The canon fine ink cartridges this printer works with contribute to this good functioning, which also work well with continuous ink systems due to the large amounts of ink they hold and the lack of an inner sponge that could bleed on the print heads.

The great photo printing quality you can achieve with this printer stands behind these cartridges. On the internet, we’ve been able to reach a solution for restoring the page counter on these, and have come up with several different methods described ahead.

If you can’t reach a solution with any of the following procedures, please contact us so we can help you. You can contact us by posting a comment in the section below this post. To learn how to subscribe and get direct emails, please visit our post how to contact us.

You should try all the procedures described ahead, and check which works the best for you before restoring the page counter. This reset procedure was made for the canon mp198, but can also work on this printer.

You could also restore the page counter without running this program, and your printer could become unlocked without using it. Here’s the link to download the restoring program for canon pixma mp190 and mp198 printers.

First possible solution for restoring the page counter on canon pixma 190 printers:

Step #1:
Turn the printer on. You usually have to connect the device and press the on/off button on it to get it running, which you can locate on the upper part of the printer.

Step #2:
Access service mode on your canon printer. Take a look at the following procedure to set your printer in service mode:

  • Settings
  • Scanner
  • Copy
  • Scanner

Step #3:
Select number 8, where you’ll be able to locate the test mode option.

Step #4:
Select 3, where eeprom clear appears.

Step #5:
Now select 0 on the ink count option to restore the ink counter.

Step #6:
Press the set button on your printer.

Step #7:
Finally, press the stop/reset button. This is the red button you use to cancel documents. This will take you back to step #3, and you will have to turn your printer off and on again.

If this isn’t the solution you were looking for, please post a comment in the section below this post so we can improve upon this post. Now we will described another procedure we’ve stumbled upon on different websites, which you can use as a second alternative to this problem.

1. Enter service mode on your canon printer.
You can do this by executing the following procedure and pressing these buttons on your printer’s panel: menu - copy - scanner - copy - copy. This will set your printer in this particular mode.

2. Select the test mode option.
Once you’re in any printer’s service mode, all these options will be in English. Unfortunately, you can’t alter the language on service mode, since the manufacturers leave this as the default language.

3. In test mode, select printer test or #8.
4. Now select eeprom clear or #3.
5. Then select ink count or #0.
6. Press the set button on your printer’s panel.
7. Now press and hold the stop/reset button on your printer for 10 seconds. Then, press the on/off button to turn your printer off. After this is done, turn your printer back on and check to see if the error persists.

If the problem continues after you’ve executed this second procedure, you may discard it completely. We’ve appreciate it very much if you could take the time to answer the form in the comment section at the end of this post, and tell us about the results you got so we can discard one or more of these possible solutions. Please take a look at the last alternative, and stick to the steps described ahead.

  1. Start this process with your printer turned off. You only need to turn it off, not disconnect the power source it’s attached to.
  2. Press the stop/reset button on the printer, and then press the button you use to turn your printer on. The stop/reset button is the one you use to cancel documents after you’ve started printing them, or to resume older printing jobs. the on/off button is used to turn the printer on.
  3. Now let go of the stop/reset button and keep the on/off button pressed down.
  4. Then press the resume button and release the on/off one.
  5. Your printer will now blink green and the restoring procedure will start.

If you can’t reach a solution with this procedure described above, please contact us by posting a comment in the section below this post. You could be interested in the canon pixma mp190 printer user manual.

Click here to download the html version in spanish. You can also download the drivers for the canon pixma 190 printers in spanish by clicking here.

How to restore the ink levels on canon mx300 printers

This particular canon printer is a multifunction model, created for office use. Also, it works with the canon pg-40 and pg-41 ink cartridges.

The quality on these cartridge is photographic, the printer itself is very small and has a high endurance. If you wish to refill these cartridge, look fo r post on how to do it on this blog.

This cartridge can print up to 22 pages per minute and copy 17 pages per minute as well. It scans at 600 ppp, and has a two-way lcd screen. This printer is compatible with both windows and mac x operating systems.
There isn’t any program that can restore this printer, or at least I can’t find one that does it, but there is a way of restoring it using the buttons on the printer itself. This restore procedure also works on the canon mx308 printer.

Restoring procedure for the canon mx300/308 printer:

Step #1:
Turn the printer off and disconnect the power power cable. You must turn the printer off first by pressing on the on/off button located on the main panel of the printer.

Take a look at the next picture to learn how to disconnect the power cable from your printer.
disconnect the power cable
Step #2:
Now press and hold the on/off button. While pressing it, connect the power cable back to the printer. The following picture will show you how the on/off button looks like.
this is the on/off button on canon printers
Step #3:
While still pressing the on/off button, hit the stop/reset one. This is the red button you usually use to cancel any printing jobs. Take a look at the following picutre.
Step #4:
Let go of the on/off button and continue to press the stop/reset one. The printer will now enter factory mode. Wait for 10 seconds until the printer displays the word inactive on the main screen. Your printer could take a bit more time than this for displaying the message.

Step #5:
Now press the next or ">" button until you reach the shipping mode 3 option, and then press the ok key. Hit the ok button one more time to wipe it. The printer will now print a test sheet.

Step #6:
Open the printer’s gate as if you were about to change the ink cartridges. To open this lid, you must also open the scanner.
open the gate that will grant you access to the ink cartridges
Step #7:
Disconnect the power cable on the printer again while keeping the cartridge gate open. You must disconnect this cable while the printer is on. Please execute this step exactly like we’re telling you to.

Step #8:
Take both ink cartridges out of the printer. Take a look at the following picture to learn how to do this.
how you should remove canon ink cartridges from the printer
Step #9:
Close the lid on the printer while the cartridges are still outside.

Step #10:
Plug the power cable back to the printer and turn it on.

Step #11:
Now all you need to do is put the cartridges back in the printer and the ink levels should appear full. You will now be able to print and refill your cartridges when ink levels are low again.

If you have any problems with this procedure, please contact us and we will gladly help you out. Just post a comment in the section below this post and we will do it.

We know you may be interested in the user manual for this printer. This is the Spanish html version of it.

You could also be interested in acquiring the drivers for this printer. Please remember to choose the proper version for your operating system. If you don’t know what version of your operating system is running on your computer, please visit our post how to learn what version of windows I’m using.

viernes, 30 de mayo de 2014

Reset for the canon pixma mp520 printer

This procedure will help you restore your canon pixma mp520 printer. This time, we’re doing it by pressing a series of buttons on the printer, so you won’t need to install any drivers or software to do it. We recommend you follow these steps just as we’ve described them for you in this post.

The canon pixma mp520 printer is an all-in-one device, and is as versatile as the rest of the models in the canon np nseries. It has photographic print quality and great functions for domestic use.

This printer can also be used in small and medium businesses. It prints up to 20 pages per minute and can copy up to 30 per minute as well. The scanner on this printer has a 2400 ppp resolution, and is compatible with windows and mac operating systems.

The procedure to restore this printer is the following:

Step #1:
First, turn your printer off using the on/off button located on the main panel.

Step #1:
here’s where things get a bit more difficult. You will need to press and hold four (4) buttons on your printer at the same time. Here’s the order in which you must press them.

1. Press the black copy button.
2. Then, press the stop/reset one.
3. Press the ok button.
4. Finally, press the on button.

The next picture may also be of help, so please take a look at it. Keep in mind you have to do this simultaneously.
If you need help of this procedure hasn’t worked out for you as we said it would, please contact us by leaving a comment in the section below this post.
steps to perform a reset
Step #3:
Once the printer’s on and it has finished a process it needs to do, let go of the first three buttons you pressed: the black-and-white copy, stop/reset and ok ones.

You may not need to do the #2 step, but we recommend you do it anyway and stick to what we’re showing you here.

You may be interested in the drivers for the canon mp250 printer. Click here to download them.
Also, we imagine you may be interested in the printer manual of the canon pixma 250 model, so please click here to get it.

How to reset the Epson Stylus Photo R360 printer

El R360 de Epson es una impresora de fotos con funciones de impresión CDR / DVD. Esta impresora puede imprimir directamente en CD / DVD con la bandeja especial suministrada.

Estas impresoras cuentan con EPSON Creativity Suite lo cual es un grupo de programas que sirven para escanear, guardar, administrar, editar e imprimir imágenes.

Utiliza 6 cartuchos de tinta para impresion fotográfica hemos conseguido por ahi el reseteador para cuando estas impresoras se bloquee podamos realizar el desbloqueo siguiendo el siguiente procedimiento.
reset Epson Stylus Photo R360
Epson Stylus Photo R360
Step #1:
In order to execute this restoring procedure on your printer, you must download a file and run it in your computer. We will not be held accountable for whatever harm this program can cause on your computer. If you choose to proceed with this procedure, you will be the only one responsible for anything that may happen on your computer and printer.

This post has been updated due to user requests. The original file uploaded to google drive can’t be shared anymore on that platform, so we’ve uploaded it to msn skydive. You’ll be able to find the link to this file at the very bottom of this entry. Thank you for your comments

The first thing you must do is download the file and extract it. You can find this program by clicking on the following link: epson sytlus photo r360 resetter.rar, and has been uploaded to google drive. This link is no longer working.

Pay here with Paypal...
Download the adjustment program for Epson Stylus R360

Now that you’ve downloaded the file, you will need to extract it. You can get this done by downloading and installing winrar, an external program, on your computer. However, this is only a recommendation. The next image will show you how to extract a file using winrar.
extracting the file to run
Step #2:
Once the file has been extracted, you must click on the program file we’re about to show you in the next picture.

Step #3:
A new message will appear on your screen, saying this is a free program. Then, you must click on accept.

Step #4:
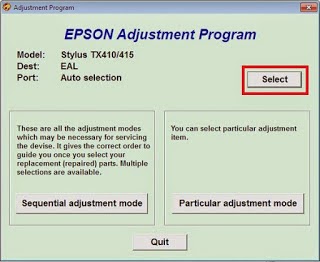
In this next step, you will need you to mark the select option, located on the upper-right side of the menu. Please take a look at the following picture.
adjustment program
adjustment program
Step #5:
Another window will appear, where you’ll be able to select the usb port the printer is attached to. Here you must select the auto selection option and click on okay. The next picture will show you how to do it.
select the port
select the port
Step #6:
The name of this restoring process will be displayed in the model name are. Please leave the default destination as is, as well as the default port option that appears on the menu, i.e. auto selection. Please look at the last picture for guidance. If you have any questions, please post  a comment in the section below this post.

After clicking on ok, this menu there you selected auto selection will disappear, and only the program’s main screen will remain. Here you must select the particular adjustment mode option. The next piture will show you where to do it.
click particular adjustment mode
Step #7:
Be very careful when executing this step, since selecting any other option but the one we suggest can be fatal for your printer, and could delete its configuration and settings permanently. Please select the waste ink pad counter option, and then click on ok to continue with this process.

This will restore your printer and it will no longer say these ink pads are full. We know printer can sometimes say they’re full even when they’re not due to the amount of pages that have been printed on this device, but they will always remain full and that these could cause some problems in the future.
waste ink pad counter set
Click on ok after selecting this option...

Step #8:
Finally, select all the options you must, and then click on check just to make sure everything’s working well. After this, click on accept, then on initialization. Wait until the process is finished and, finally, click on finish.

Now you must turn your printer off, and wait for 30 seconds before turning it back on. The page counter that was saying the waste ink pads were full is not restored. Please take a look at the following picture.
steps to complete the process
Please remember you can always post a comment in the section below this post to contact us. We will always be happy to help you.

We also know you may be interested on this printer’s manual or user guide. Please click on this link to download this manual in Spanish.

miércoles, 28 de mayo de 2014

How to restore the epson stylus tx140 printer

The epson stylus tx140 model can photocopy and print documents and pictures. It’s one of the best multifunction printers in the market, and can print laser quality documents thanks to its durable ink.

It works with four (4) individual ink cartridges, which gives you the advantage of changing any one of them when necessary. This printer can produce up to 34 pages per minute with the black ink cartridge, and you can use it to print your pictures directly from your camera or memory card.

It’s compatible with multiple operating systems, such as windows 2000, windowsxp, windowsxp professional x64 edition, windows vista, macintosh usb, macintosh os x 10.3.9, 10.4.x and 10.5.x. You can load up to 120 sheets in the paper tray.

This printer model works with the following epson ink cartridges:
73n black
73hn black (high capacity)
73n cyan
73n magenta
73n yellow.

These printers are one of the best candidates for CISS -continuous ink system- installation. As you may know by now, these ink cartridges lack the inner sponge some other have, and that makes them suitable for this ink system. These cartridges are also very easily restored and have very high printing quality, which also contributes to the continuous ink system.

However, using this printer for work purposes can fill up the ink deposits, a set of sponges that absorb all the ink residues from our printing jobs. This will show up on many printers and will force you to restore it back to factory settings. This is the main reason why we’ve created this post.

Reading this post will teach you how to restore the epson stylus tx140 printer. You will only need to follow the steps we’re about to show you.

Please keep in mind you will need to download an external file and have it run on your computer, and that we will not be held accountable for any damages the program causes on it. If you choose to continue with this procedure, you will be the only one responsible for what may happen with your computer and printer.

Here is the restoring procedure for this printer:

Step #1:
First of all, download the file we mentioned earlier; you will need to restore your epson stylus tx140 printer.

Please with Paypal here...
Download the reset file for the epson stylus tx140

Step #2:
Download and save this file on your computer’s desktop. Then, extract the file from the zipped folder and save the new one on the desktop as well.

Step #3:
Disconnect any other printers that may be attached to your computer at this moment. It’s extremely important you do this, since running this file on any  other printer may compromise its general functions.

Step #4:
With your printer and computer on, open the extracted folder and double-click on the adjprog.exe icon in it. The following picture will show you how it looks.

Step #5:
A message will appear on your computer screen, saying this is a free program. Please click on accept.

Step #6:
You must now click on the select option, located on the upper-right part of the menu. Take a look at the next picture.
click to select adjusntment program
Step #7:
A new window will be displayed, where you will be able to mark the usb port the epson stylus tx140 printer is connected to. Now, select the auto select option and click on ok. Please look at the next image.
select the port where the printer is connected
Step #8:
The auto selection window will disappear from our screen, but the main program will remain open. You will now have to select the particular adjustment mode on the main menu. The following picture will instruct you.
now select direct mode adjustment
Step #9:
You will need to be very careful executing this step, since selecting any other option may be fatal for your printer. It could even delete the settings on this particular model forever, so please stick to the option we’re about to tell you.

You must only select the waste ink pad counter option, and then click on ok to continue. This will restore the printer and make it think it no longer has waste ink pads. Please keep in mind these sponges will remain full even after the printer has been restored.

We know printers can send out this message even if they’re not completely full, but having full waste ink pads can cause you some problems in the future.
now select waste ink pad counter
Click on ok after selecting this option from the listing.

Step #10:
Finally, select all the options you must, and then click on check to make sure everything’s fine. Now please click on accept, and later on the initialization option. You may click on finish after the entire process is done.

Now that you’ve restored your printer, please turn it off and let it rest for 30 seconds before turning it back on. This will have restored the page counter program that was telling you the waste ink pads inside your printer were full. Now please take a look at the following picture.
last steps to reset
last steps to reset
Remember if you need any help from us, please post a comment in the section below this post and we will gladly help you out.

You may be interested in downloading the drivers for the epson stylus tx140 printer. These are in Spanish and are compatible with windowsxp and widows7. We also hae the Epson stylus tx140 user manual in Spanish, which you can download by clicking on this link.

How to unlock a samsung ml-1640 laser printer

The samsung ml-1640 printer has been made to fit in modern offices. Its modern size takes up very little room and leaves a lot of space for other office appliances.

We usually recommend it if you want to save on toner, since it uses 30% less product in the saving printing mode, and still shows good printing quality on your paper sheets. It’s also very easy to use, and you can add pages or install toner cartridges in it without having any problems.

This printer is compatible with several different operating system, such as windows, a few linux versions, and the mac 10.3-10.5 ones. It’s very resistant and can yield up to 5,000 pages a month.

Unfortunately, this printer can become located, whether it’s because you’ve refilled its toner cartridge, or because some part of the printing process is not working as well as it should. This is why we’ve created this post where we’ll show how you how to unlock it. Personally, we recommend you buy this product because it’s a great monochrome printer, even if it’s not being manufactured anymore.

Many of these printers were sold in Latin America, so we need to know how to operate them and perform certain procedures on them, such as this unlock one.

The printer unlocking procedure is the following:

In order to finish restoring this printer, you will need to instal an external program. We will not be held accountable for any harm that it may cause on your computer. If it does, we suggest you restore your entire system.

Step #1:

First of all, make sure your printer is on and that it’s the only printer connected to your computer. If there are any others attached to it, please disconnect them. The program you’re about to run will only work on this samsung printer.

Step #2:

Then, please download the file included in the following link. You should download and extract this file to execute it properly.

Step #3:

Finally, execute the downl1643_83 file.
After you’ve finished installing it, wait for the LEDs on your printer to start blinking and for it to reboot. Then, wait 20 seconds and turn the printer of yourself. You should wait another 50 seconds before turning the printer on again.

This procedure will also restore the page counter on your printer and get rid of every single internal mistake. However, this procedure may not work for you, so please leave a comment in the section below this post and we will help you out.

You may also be interested in the samsung ml-1640 laser printer manual. Click here to download the Spanish version.

viernes, 23 de mayo de 2014

The p07 error message in canon pixma mp280 printers - full waste ink pads

The p07 error code in canon pixma mp280 printers, also known as the full waste ink pads one, means the printer has already done all the prints it could with the set of waste ink pads installed inside it. This error message is more common among printers with continuous ink systems, since these kinds of printers demands more ink absorbers for their own efficiency needs.

What canon is trying to do with this error is keeping the printer’s residues from reaching the motherboard and causing damage. Getting it wet with ink can produce short circuits and many more electrical mishaps, just as it would on any other piece of hardware. This will stop you from printing until you take the printer to a proper maintenance center.

Now we will show you how to restore your canon pixma mp280 printer to get rid of this error message. This post also includes a download link to a restore software.

Before you do anything else:

Turn off every printer attached to the computer, including this one. After turning it off, please disconnect both the USb and power cables from it. Then, press and hold the stop/reset button, and while it’s pushed down, press the on/off button again. After this, you must press the stop/reset button five times in a row to access your printer’s service mode.
Once you’re in service mode, your printer will move a bit and then show the number 1 on its main screen.

Buy this program via Paypal for just $3.00...
Here’s the download link where you can get the service tool program for your canon pixma mp280 printers.
unzip the downloaded program
In this step, you will need to open the zipped file. You can extract it if you want, but you don’t have to do it, and you can still work with the zipped or compressed file as we did in this post. Please take a look at the last image.
unzip the downloaded program complete
En la pantalla siguiente nos aparecerán una serie de opciones en la cual debemos dar click en "SET" de la parte "Clear Ink Counter".
as running the software correctly
Finally, turn your printer off and on again. The on/off button on your printer will blink after you press the set key; this means everything’s set. If you want, you can do this twice, but it’s not mandatory.

If this tutorial doesn’t work out for you, please contact us by leaving a comment in the section below this post, and we will gladly help you out.

This post’s content was last updated on 02/14/2013. The download link has been replaced and some information about the restoring process and the blinking on/off lights has been added. Created by +José Altagracia Paredes 

miércoles, 21 de mayo de 2014

How to reset HP 27 black ink cartridges

Most of the time after you’ve refilled your ink cartridges, your printer will tell you they’ve ran out of ink completely. Your printer is trying to tell you that ink cartridge isn’t working anymore, and that you need to replace the old HP 27 black one with a new one. This, of course, is related to the page counter program installed in our printers, a process we’re already familiar with.

However, this is a very common situation after having your ink cartridges refilled. This is why we’ve learned how to restore our ink cartridges back to their original factory settings, which solves this issue right away, keeps this message from appearing on screen and saves you having to buy a brand new ink cartridge.

This following procedure will teach you how to do this by just using duct tape. We’ve already done something similar to this on HP 60 black ink cartridges, which you can read about in the following post: how to reset hp 60 cartridge.

These are the steps you must follow to restore the HP 27:

Step #1:
First, remove the HP 27 black ink cartridge from your printer while it’s turned on and fully functional.

Step #2:
Then, place a small piece of duct tape right on top of the upper-left contact on your ink cartridge, just as is shown in the following picture. Please take a good look at it.
conector first to reset
Step #3:
Place the ink cartridge back in the printer with the duct tape still on the contacts.
like putting the ink cartridge
Step #4:
The printer will print an alignment sheet as soon as you set the ink cartridge back inside it. These sheets will show us everything’s working well and that things are going according to plan.

Step #5:
You can remove the ink cartridge from your printer as soon as the alignment sheet comes out of it.

Step #6:
Now, put a bit more duct tape on the other set of contacts on your ink cartridge, just as we’re showing you in the next picture.
the second connector
Step #7:
Place the ink cartridge back in the printers with both sides covered in duct tape.

Step #8:
The printer will now make another alignment sheet.

Step #9:
After the second alignment sheet is done, please remove the ink cartridge from the printer once more.

Step #10:
Finally, remove all the pieces of duct tape from the HP 27 black ink cartridges. Please make sure there isn’t any glue left on them, since this can cause future printing issues.

If this tutorial hasn’t worked out for you, and things haven’t gone according to your expectations, please contact us by leaving a comment in the section below this post.

miércoles, 30 de abril de 2014

Solving the full waste ink pad error message on Canon printers

As we all know, Canon printers have the best prices and print quality all over the market. You can even choose to refill your ink cartridges many times, but you must know you will need to restore these printers every time you install a refilled cartridge in it. Companies will always have a trick or two up their sleeves, so we must be prepared for them at all times.

When our Canon printers tells us they’re ran out of ink, we can restore them and keep using the same cartridge. This will repeat itself about 5 more times until the cartridge’s completely depleted. However, another error message is just around the corner.

In principle, restoring a printer will make it understand a new ink cartridge has been installed in it, replacing the last one. The printer will now say the waste ink absorber pad is full, even when we know it’s not so, and block itself. At this point, you’re supposed to take it to the shop and have a tech look at it.

The message displayed on your printer is the following:

Full waste ink pad.

This error message tells us enough ink has spilled out the ink cartridges to clean both the inner sponges, which are under them, and the ink cartridges themselves. The ink pads are allegedly so full the printer has stopped working. This simple error can be fixed by restoring your Canon printer back to factory settings.

Solution to the Full Waste Ink Pad error message on Canon printers:


1. Disconnect the printer’s power cord.
disconnecting the power cord from the printer
2. Press and hold the on/off button on your printer while the power cable’s still unplugged.
pressing the button on printer
3. Without letting the on/off button go, connect the printer’s power cable back to it. The LED indicator will now shine green.

4. Keep the on/off button pressed and push down the paper feed key. This button looks like this on your Canon printer:
reset button
reset
5. Let go of the on/off button and keep the paper feed one pushed down.

6. Finally, push the on/off button again while keeping the Paper Feed one pressed down. Now the printer should be working as if it were brand new.

You can identify this printer on your listing because of the “copy 1” words at the end of its name.

Restoring program for Epson T20, T23, T24, T1100 and TX220 printers

Epson printers are one of the best ones in the market nowadays: their high page yield, ink quality and interface tools are one of the best ones I’ve ever seen. In my own opinion, their print quality standards are closely followed by Brother printers.

These particular printer models have a page counter program installed in them, which keeps track of every paper sheet printed with your ink cartridges. Once you’ve reached and/or surpassed this amount, you will need to restore your entire printer. Since the interface on these printers is so friendly, it will let us restore it by using an external program.

There are very few printers out there that have this kind of restoring method. As you may know by now, most printers are restored by pressing certain buttons, but when it comes to Epson printers there are a few helpful programs out there that can perform this task for us.
an Epson printer restored using this same program
You may find many entries in our post that contain information about installing and restoring Epson printers.

Unfortunately, we can’t show you any pictures of these processes in the Epson printer models mentioned in the title, which are known for their high print quality.

However, you can find the restoring program we mentioned by clicking on these download links:

Found at DepositFiles:
First download link for the Epson T20, T23, T24, T1100 and TX220 restoring program.

Found at Uploading:
Second download link for the Epson T20, T23, T24, T1100 and TX220 restoring program.

Found at Fileserve:
Third download link for the Epson T20, T23, T24, T1100 and TX220 restoring program.

If you need more information about this subject or this procedure doesn’t work out for you, please post a comment in the section below this post. We will do everything in our power to answer as soon as possible. All the information shared on this blog has been tested out in our workshop, but we consider your comments and feedback to be the best testing process out there.

lunes, 28 de abril de 2014

How to restore Epson TX100 and TX105 printers

Restoring Epson TX100 and TX105 printers takes a bit of work, and you will need to downloading this specific adjustment program. Run this program on your printers by clicking on the software.exe file in the downloading folder.

Both Epson Stylus TX100 and TX105 are Multifunction printers have been designed to read top print quality standards in all their prints, scans and copies.

This particular Epson printer can yield up to 5760dpi with variable ink droplet technology, and a printing speed of 26ppm (pages per minute) for Black text, and 14ppm for Colored text printed on A4 paper sheets.

You can now restore the Epson TX100 and TX105 printer models by following these steps:

1. Run the program by clicking on the Loader.exe file. It won’t need to be installed on your printers or computer.

Please click on the Accept button, and then proceed to select your printer type on the upcoming menu, which will only include the Epson TX100 and TX105 models. Press OK after choosing and click on t Particular Adjustment Mode option.


Remember we’ve already tested this program out and didn’t have any issues with it. However, we could be using different antivirus on our computers, so please remember to disable them just for a few minutes if they’re causing any problems during the installation process. You can also contact us by leaving a comment in the section below this post.
particular adjustment
particular adjustment program
2. Click on Waste Ink Pad Counter on the maintenance menu displayed on your computer’s screen, and then click on OK.
reset printer epson program adjustment
adjustment
2. Click on Waste Ink Pad Counter on the maintenance menu displayed on your computer’s screen, and then click on OK.
waste ink pad counter
Just pay using Paypal U.S. $ 3.00...

Note: We can’t guarantee this program won’t cause any damage to your printer or computer, since we’ve only talked about the restoring process in this post. We will not be held accountable for any harm that may come to your printer.

How to restore Epson TX121, T14 and T1100 printers

After waiting for a long time and searching all over the Internet for these programs to restore TX121, T13 and T1100 printers, we’ve finally found them and tested them out. Getting to them was a very difficult task.

Of course, anything’s possible, so we found the Epson 1100 resetter on Eidoreset, and the T13 and TX121 ones on Mediafire, uploaded by an user called OrTHoTaMiNe.

We’ve already tried out all of these programs on our computers and haven’t had a single issue during the installation process. Our computer’s antivirus didn’t seem to have a problem with it either, but we suggest you deactivate it for a couple of minutes on WindowsXP, Windows7 and Windows Vista, just in case this software has some issue with your antivirus.

Restoring printers, especially Epson ones, is a very important procedure. These particular printers work very well with Continuous Ink Systems, since their ink cartridges lack the traditional inner sponges and you will only need to refill them with the amount of ink you’ve spend over time.

Epson printers are also known for their high print quality in colored prints due to their use of pigmented inks. This specific product has a very strict elaboration process.


We recommend all our readers to post a comment on the section below this post if you come across any problems during this entire tutorial. We will be glad to help you solve your problem.

Here is a screenshot of how the restoring program looks on screen:
reset printer epson tx121 waste ink pad counter

Here are the direct download links of the restoring programs for Epson T13, TX121 and T1100 printers:


Remember if you have problems leave a comment will be gladly answered.

viernes, 25 de abril de 2014

How to reset continuous ink systems on epson printers

Continuous Ink Systems have become very popular nowadays, and even companies such as Hewlett-Packard (HP) and Epson have added modern CISS printers to their catalogues.

This, of course, means the consumers will have to adapt to certain novelties imposed by the bigger companies. Unfortunately, Continuous Ink Systems don’t work as well as they seem to, especially in the case of Canon printers. Some of us also count with home-installed CISS on our printers, a customization which is very popular among Canon, HP, Brother and Epson printers. This last brand is the one we’re dedicating this particular post to.

These Continuous Ink Systems have a lot going on. Since they lack the inner sponges traditional ink cartridges have, you don’t have to add small amounts of ink in a specific spot, rather than replacing one load of ink with the other.
Another condition that favours this printer’s overall functioning is the easy restoring mode that’s included in the Continuous Ink System cartridges.The printer can be restored back to factory settings directly from the card attached to the ink cartridges, which will send electric shocks its way.
ink system reset
reset ink system epson
Continuous Ink Systems, however, do share one common issue: ink cartridges need to be restored once they’ve reached the amount of pages they were made to print. This ia very common scenario that can repeat itself in any CISS.

The actual question here is how to restore the Continuous Ink Systems installed in an Epson printer. This  is a very simple procedure: like we said before, this CISS can be restored by pressing a button on the ink cartridges.
button for reset epson printer
reset epson printer correctly
You will be able to find this same Restore button on most Epson CISS printers, and we recommend you stick to this procedure. Any feedback on this issue will be posted by us in the comments.

Steps to reset Epson printers with Continuous Ink Systems:

1. Turn the printer off.
2. Disconnect the printer’s power cord.
3. Connect the power cord back to the printer.
4. Turn your Epson printer on.
5. In case you have the Replace Ink Cartridges option on your printer, please select it. If you don’t, click on the following button.
reset epson printer
6. This will make the ink cartridges go to a changing position. They must be in this exact spot in order to restore the Continuous Ink System.
7. Press the Restore button on your CISS for about 5 to 6 seconds.
8. Press the Restore button again.
9. The restoring process will start on your printer, which should last about 20 seconds. The printer will be making noises similar to the ones it makes when it’s printing a document.

In case the printer doesn’t start this process, please repeat steps #7 and #8 multiple times by pressing the Restore button more than twice. You could also press the Stop menu to get this procedure going.

Here are some pictures to help you get familiar with the restoring process:

whatever you say the images below to solve the problem
ink cartridge epson
In this picture, the ink cartridges are in their changing position. Some printer manuals have these instructions in Ink Cartridge Replacement Tools, but some others can only get the ink cartridges in place by pressing the Stop-Reset button.

This picture shows how ink cartridges look when they’re installed on the printer, not replaced.

We recommend you don’t press the restore button for more than a few seconds, and that you change the printer’s battery once a year.
here you can see which is the button that solves the problem
button to reset
The restoring button will show up on the right side of your Epson Stylus printer.
If you have any question or inquiry, or simply can’t understand this post, please start a thread in our forum and we will gladly help you out. You can post your question in a comment in the section below this post and we will get back to you in less than 10 minutes.

jueves, 31 de enero de 2013

Resetting the chips on Sharp AL-2021/AL-2031/AL-2041 copiers

Dear readers, this question has been all over the Internet recently, and I’ve also wanted to know the answer to it in the past. The Internet is also responsible for helping us techs out, who must solve many problems in our workshops.

As it turns out, Sharp has stopped standing out for us and is now focused on selling more and more printers. It seems they’re only interested in getting us to buy the latest product and throwing them out as soon as a new one comes along.
reset sharp toner chip
reset tóner chip for sharp
Sharp AI-1000 toners used to be used in Sharp AI-2040 printers, for example. These toners in particular are known for their resistance, and they yield  much more than any other toner, whether it’s a new or refilled one.Nowadays, this toner has been replaced by the sought-after AL-204TD, a very hard toner to use. If you have one at hand, you can make sure we’re talking about the same toner.

This toner is renowned among us techs nowadays, and the main question lies in how to restore them and get them to stop saying they’re empty after they’ve ran out; buying a new toner off the bat is not an easy thing to do. The main problem here is the printer refuses to continue printing, a problem caused by none other than the chip you can see in this next picture.
toner cartridge for sharp al-2031

This very chip shown in the picture can be a bit hard to restore, and we can’t offer a solution for this situation right now. If you, reader, happen to know of a solution to this particular issue, we’d be very grateful if you put it in a comment in the section below this post so we could publish it on the blog.

However, not all is lost. Remember why I keep recommending you install a page counter program on your computer? Here’s the reason why.

Installing this piece of software is one of the best things we can do; one of its main advantages is learning when our toner or ink cartridge is about to run out. Like we said, there’s still hope, and this is the one loophole Sharp completely forgot about.

If toner runs out in these printers and you choose to refill them, we regret to inform you the printer will always say the cartridges are empty and you will need to buy an entirely new chip to fix this problem. We happen to have these in stock in our online shop, so look for them, order the exact amount you need and check our shipping and delivery options. In our store tinta.com.do, we offer them to you at the best price in the entire American continent, and can even provide a tracking number so you always know your order’s exact location.

Another thing you can do is to avoid letting the toner dust run out completely. If you already know how long it takes for this to happen, just refill it before the toner’s empty. You’ll then be using this same toner until the toner developer is depleted. This is exactly why we recommend you install a page counter.

Note: This post has been created by us using information we’ve compiled in our workshop, where we’ve fixed this problem multiple times. We certainly appreciate any comment you may have, and are aware this is not the only piece of information regarding this subject. If you know of any other fix to this issue, please post it in the section below.

viernes, 25 de enero de 2013

Solving the 5200 error message on Canon printers

This post deals with solving 5200 error code on Canon printers, which may appear after restoring your printer many times. This will be pretty easy.

Once this error message appears, you can try to restore your ink cartridges as many times as you want and get no results whatsoever. This is why we suggest a different sort of rebooting process, focusing on restoring the printer instead of the cartridges.

The steps to solving 5200 error code on Canon printers are the following:


  1. Disconnect your printer’s power cord without disconnecting the printer from the PC.
  2. Open the printer’s gate.
  3. Press the On/Off button for about 5 to 10 seconds.
  4. Plug the power cord back in the printer while still pressing the On/Off button.
  5. Use a pen to press the button that indicates the printer gate’s closed for about ten seconds. Do not let go of the On/Off key. 
  6. Release the On/Off button and close the printer’s gate.
  7. Once it’s been closed, turn the printer on.

This procedure should get rid of the 5200 error message on your Canon printer right away. However, if the problem persists, try restarting the ink cartridges manually one more time.

This post is based on information we’ve compiled from the Internet; you can click on this list to visit the origianl post. We’ve also executed this procedure in our workshop and everything has gone smoothly. This post doesn’t belong to the printer’s manufacturer at all. If you know of any other solution to this problem, we’d be very grateful if you posted it in a comment in the section below.

jueves, 24 de enero de 2013

How to reset normal // XLS #920 HP ink cartridges

“The following ink cartridge appears to be missing or damaged.”

This is the message that torments us when we refill #920 and #920XL cartridges.


Here is the solution:

So far, we do not know of any method that works 100% of the time on this type of cartridge when it comes to resetting them without changing the chip. As you already know, occasionally the chip alone often costs half as much as a new ink cartridge.

Until now, we have been proving, unofficially, a great way of resetting these cartridges. We’d have to keep looking for solutions, as you also should. If you have another one, please comment on this post in order to help everyone out.


Tutorial:

  • We recommend you remove the head print and the ink cartridges from your printer before getting this process started. You will have to clean the cartridges delicately with toilet paper or paper napkins, considering their sensibility.
  • First, we restore the printer entirely. When these cartridges cause problems, they stop reacting to any key or button that can be pressed. This product’s evolution is only fair for the sellers.
  • In order to restore the printer, we must disconnect it for about twenty (20) seconds. “The printer must be on when we disconnect it.”
  • The printer must be disconnected for at least twenty (20) seconds, “but we’d it prefer if you left a few more seconds pass.”
  • Before reconnecting the printer,  we must press the keys corresponding to number three (3) and the pound or hashtag key (#).
  • Now that we’ve connected the printer, we’ll have to wait while keeping both keys pressed down, until the printer sends the same error message again: “The following ink cartridge appears to be missing or damaged.” The damaged ink cartridges’ names will appear.
  • After this entire process is done, we can start discarding the ink cartridges that are effectively damaged. What you must do is open the printer, remove the cartridge the printer is pointing out as damaged and put it back in. If this happens with another cartridge or the rest of them, you must do the same with each and every one of them until they’re all working properly.

This can happen more than once on the same ink cartridge, and that’s fine. You only need to remove the cartridge and repeat the process once more.

“Note: the ink cartridges will not show the amount of remaining ink again, but they will print perfectly and without problems. The printer will no longer recognize the amount of ink. In case you want this amount to be displayed, we recommend you change the chip for a new one.”

miércoles, 23 de enero de 2013

Solving the P02 error message in Canon MP250 printers

This problem tends to show up in our printers very frequently when we’ve stopped using it for a while, or even when we use it very little and keep it saved and stored for most of the time, jamming the cartridge rail. You can also read up on Canon codes and errors i this post; we recommend you use the Ctrl+F shortcut to search the entire entry.

Error message P-02 specifically means an error has occured transporting the cartridge carriage, which may be caused by any foreign object found in said rail: pieces of wrinkled paper, paper clips, plastic residues of some broken gear, among others.

Lack of lubrication and cleaning of the main axis, which could also be filled with paper fuzz, dust and remains of old lubricant, could also compromise the carriage’s free transit.


If you’ve installed a Continuous Ink System on this printer, then the error may have been caused by the system’s hoses: they could be in the way of the carriage, obstructing it or not allowing it to reach its final goal. In this case, all you have to do is adjust their length, making the hoses longer and allowing the carriage to move wherever it must.

You must take a good look and make sure you’ve gotten rid of whatever the cause may be

You may also be interested in learning how to refill Canon 210 Black and 211 Tricolor ink cartridges. There, you will also find a step-by-step tutorial that will help you restore your printer; we find that procedure online and haven’t tested it out in our workshop.

Turn the multifunctional printer on.
1. Press the Menu button.
2. Press SCAN + COPY + SCAN to access your printer’s Service Mode.
3. Touch the + key until you’ve reached NVRAM ACCESS.
4. Once you’re there, press OK.
5. Using the + or - keys, locate yourself in Set ABS-M Level and choose OK.
6. Lower the number shown all the way down to 0. Press OK once this has been done.
7. Repeat steps 5 and 6 in Set ABS-P Level and hit OK once more.
8. Press the STOP button to exit Service Mode.

Turn the printer off and back again, and it’ll be ready.
---
This information has been compiled from different sources.
Collaboration credits go out to Raúl.

This information is used by us in our workshop on a daily basis and, so far, it has worked out flawlessly. We recommend you follow the same steps we did to solve this problem, but keep in mind it’s only our staff’s experience with this issue and it’s not mandatory you do exactly what we did.

This post will teach you how to fix the P02 error message on your Canon MP250 printer by following eight simple steps.