miércoles, 30 de abril de 2014

How to install printers when lacking the original drivers CD

Getting a printer from a friend, a garage sale, as a gift at the office, or even restoring our entire computer can put us in a difficult position if we lack the original drivers CD that comes with the printer. These situations are very common and we may find ourselves without any drivers for our printers.

Not having the official installation process doesn’t have to be a problem if you follow the steps described ahead. Please stick to them and repeat them on your own printer.

If you weren’t able to find the drivers, things didn’t work out as expected, or just have a question regarding this subject, please contact us by leaving a comment in the section below this post. We will be happy to get back to you.

Procedure for installing a printer on your computer when lacking the original drivers CD:

Step #1:
Keep the printer attached to the computer via USB cable at all times. This particular cable is in charge of passing the necessary data from the computer to the printer in order to get the printing process started. It will look similar to the one shown in the next picture.

Don’t worry about finding this cable: it’s very popular and can be found at any printer or computer store for a very low price. You must only ask for a printer USB cable.
cable usb
usb cable
Step #2:
Turn the computer on and wait for it to be fully functional; it needs to be fully operational to recognize a new device has been attached to it You can now turn your printer on.

Step #3:
Open the Start menu on your computer and click on the Control Panel.

Step #4:
You can now click on Printers and Faxes, or Printing Devices.
printer and devices
printer and devices
Step #5:
You cann now click on Add Printer. Important note: The Add Printer option on Widnows7 is found in the upper-left side of the window, as shown in the following picture. On WindowsXP, you can find it on the top of the left column.

If you’re having trouble finding this option on your OS, please contact us by leaving a comment in the section below this post. We will tend to your every need and take care of this problem for you. Please learn how to contact us in this post.
add printer in the upper left
Step #6:
The printer wizard will get going, and you must keep clicking on Next. Please let the computer recognize your printer using the Plug and Play system.
plug and play
plug and play windows
Note: The Plug and Play program will automatically run on Windows7. You will only need to click on the Add Printer option and it will detect the printing device automatically.

Here’s a picture of how this may look like on your Windows7-using computer. This program will detect every printer available for installation, and get your computer working on this immediately.

If this doesn’t happen, please select the printer you want to install. You can always use the “What can I do?” option on Windows help if your computer isn’t recognizing the printer.

Step #7:
Ig the printer hasn’t been recognized by the computer yet, look for the USB port the printer’s cable is attached to and select it as your conexion method. If you’re not using a modern printer model, there’s another installation process compatible with Windows7 and WindowsXP. This procedure will force you to choose your  printer’s brand and model from a listing displayed on screen.

Step #8:
Select your own printer brand and model from the listing that will appear on screen, click on next and follow all the steps of the procedure. If this method doesn’t work properly, please download the drivers directly from the printer manufacturer’s website. You will be able to install the drivers once you’ve extracted the files in the zipped folder.

Please keep in mind that, even with all this information, this alternative installation procedure could fail at any moment. If it doesn’t work out for you, remember we’re here to help. You will only need to post a comment in the section below this post to contact us. We will get back to you as soon as possible.

How to configure wireless printers

First of all, a printer doesn’t have to be attached to a computer in order to print a document. This is one of the many advantages you’ll be able to find in any home or business where there’s a laptop.

Nowadays, companies such as Hewlett-Packard (HP), Canon and Epson are setting these wireless systems on their printers. This seems to be a key element in the printing market, used to impress and pamper the general audience with new developments and features.

These companies are, however, going a bit fast for us, and we’re not able to keep up with new articles or adapt to them.
This is why we will teach you how to set a wireless printer up without needing any cables. You will also be able to use and configure a LAN network for printing purposes.

Step #1:
Open your computer’s start menu and click on printing devices.
old windows logo
old windows logo
Step #2:
Now, click on the add printer option located on the upper side of the menu. A new window will be displayed on screen.

Step #3:
Please click on the add wireless or Bluetooth printer option on the menu. The computer will search for any printer available for this specific installation process.
adding a printer to a wireless network
Step #4:
Click on the printer of your choosing once your computer has detected all the devices available.

Step #5:
Click on Install once it shows up on your screen.

Step #6:
Follow every instruction to the letter and click on the Finish option once it shows up. You can now configure your printer according to your own wants and needs.

Important note: If you need to install the same printer on multiple computers using this same method, you will need to install this printer’s drivers on each and every printer you want to use it on to may it work properly.

Solving the full waste ink pad error message on Canon printers

As we all know, Canon printers have the best prices and print quality all over the market. You can even choose to refill your ink cartridges many times, but you must know you will need to restore these printers every time you install a refilled cartridge in it. Companies will always have a trick or two up their sleeves, so we must be prepared for them at all times.

When our Canon printers tells us they’re ran out of ink, we can restore them and keep using the same cartridge. This will repeat itself about 5 more times until the cartridge’s completely depleted. However, another error message is just around the corner.

In principle, restoring a printer will make it understand a new ink cartridge has been installed in it, replacing the last one. The printer will now say the waste ink absorber pad is full, even when we know it’s not so, and block itself. At this point, you’re supposed to take it to the shop and have a tech look at it.

The message displayed on your printer is the following:

Full waste ink pad.

This error message tells us enough ink has spilled out the ink cartridges to clean both the inner sponges, which are under them, and the ink cartridges themselves. The ink pads are allegedly so full the printer has stopped working. This simple error can be fixed by restoring your Canon printer back to factory settings.

Solution to the Full Waste Ink Pad error message on Canon printers:


1. Disconnect the printer’s power cord.
disconnecting the power cord from the printer
2. Press and hold the on/off button on your printer while the power cable’s still unplugged.
pressing the button on printer
3. Without letting the on/off button go, connect the printer’s power cable back to it. The LED indicator will now shine green.

4. Keep the on/off button pressed and push down the paper feed key. This button looks like this on your Canon printer:
reset button
reset
5. Let go of the on/off button and keep the paper feed one pushed down.

6. Finally, push the on/off button again while keeping the Paper Feed one pressed down. Now the printer should be working as if it were brand new.

You can identify this printer on your listing because of the “copy 1” words at the end of its name.

Restoring program for Epson T20, T23, T24, T1100 and TX220 printers

Epson printers are one of the best ones in the market nowadays: their high page yield, ink quality and interface tools are one of the best ones I’ve ever seen. In my own opinion, their print quality standards are closely followed by Brother printers.

These particular printer models have a page counter program installed in them, which keeps track of every paper sheet printed with your ink cartridges. Once you’ve reached and/or surpassed this amount, you will need to restore your entire printer. Since the interface on these printers is so friendly, it will let us restore it by using an external program.

There are very few printers out there that have this kind of restoring method. As you may know by now, most printers are restored by pressing certain buttons, but when it comes to Epson printers there are a few helpful programs out there that can perform this task for us.
an Epson printer restored using this same program
You may find many entries in our post that contain information about installing and restoring Epson printers.

Unfortunately, we can’t show you any pictures of these processes in the Epson printer models mentioned in the title, which are known for their high print quality.

However, you can find the restoring program we mentioned by clicking on these download links:

Found at DepositFiles:
First download link for the Epson T20, T23, T24, T1100 and TX220 restoring program.

Found at Uploading:
Second download link for the Epson T20, T23, T24, T1100 and TX220 restoring program.

Found at Fileserve:
Third download link for the Epson T20, T23, T24, T1100 and TX220 restoring program.

If you need more information about this subject or this procedure doesn’t work out for you, please post a comment in the section below this post. We will do everything in our power to answer as soon as possible. All the information shared on this blog has been tested out in our workshop, but we consider your comments and feedback to be the best testing process out there.

How to restore HP 60 ink cartridges by using duct tape

With time, we’ve come to find many solutions for a variety of issues that have shown up in our own  printer workshop. This is why we‘ve chosen to create this post with a relatively vague solution, but one we can assure works 100% of the time: restoring your HP ink cartridges with duct tape.

This particular solution can isolate some of the contacts on your printer and get it confused about the type of ink cartridge we’re installing on it, and for how long it has been used. As you already know, printers have page counting programs that keep track of every page printed with each ink cartridge that has been installed in it.

The printer will know an ink cartridge has reached its maximum printing potential and send out error messages if we have them refilled and reinstalled in it. This is how Canon guarantees its earnings.

However, we can keep this from happening if we choose to install the basic set of drivers instead of the full package, as is indicated in the following post: I’ve refilled my ink cartridges but my printer says they’re empty.

Now that we know what the problem is, we need to find a solution for it. In our case, we’ll explain the one we’ve already used: restoring the HP 60 ink cartridges.

These are the materials we will need: You will need duct tape, preferably  thick, to keep the electricity from going back and forth. The printer and ink cartridge contacts will try to reach each other, so we must get in the middle of this in order to restore them.

Step #1:
Locate the contacts on your ink cartridges: they can be found on the front side. Please avoid touching them since they’re very sensitive to touch and could easily lose this trait.
hp cartridge connectors 60 for restoring
Step #2:
Cover two (2) of these contacts on your HP 60 ink cartridge, specifically the #3 and #4 ones. Do this before you place the ink cartridge back in the printer, and remember to use resistant duct tape in order to blow the electricity from passing from one contact to the other and isolate the ink cartridge completely.
You can see this in the next picture.
covering ribbon connectors hp 60 cartridge
Step #3:
You must cover these same contacts on the Colored ink cartridge as well before putting them back in the printer, just to make sure this process works. If this procedure doesn’t work out for you, remember we’re here to help, and you must only leave your question in a comment in the section below this post so we can get back to you.
tri-color ink cartridge covering three connectors
Step #4:
Once both sets of contacts are covered in the Colored and Black ink cartridges, we recommend you set them back in the printer at the same time. Do not install one after the other, but do it simultaneously, and certainly do not close the printer’s lid in the process. You can close it after they’ve both been installed in the printer.

Step #5:
Now that you’ve put the cartridges back and closed the printer’s lid, wait a few moments. The printer will send out an error message saying both ink cartridges are faulty, Don’t worry, this is perfectly normal and expected. It actually means the restoring process is working, so just continue with step #6.

Step #6:
Turn your HP printer off.

Step #7:
Move the ink cartridge carriage until the very center of the printer. Remember you must do this while the printer is on, and do not turn it on until this tutorial tells you to. You can now remove the ink cartridges from the printer. Please keep the duct tape on both contacts, we will be needing it again.

Step #8:
Add more duct tape to the ink cartridge contacts, this time to contacts #3, #4 and #5, the ones found on the right side of the cartridge starting from the bottom up. Their exact location can be found in the following picture.
connectors plugging their points
Step #9:
You can now set the ink cartridges back in the printer. Wait a little until the same error message as in step #5 is displayed on screen. Like we said before, these errors are perfectly normal and only mean the restore method is working.

Step #10:
Turn your printer off again, move the ink cartridge carriage to the center and extract them once more. You must now go back to the pieces of duct tape that were covering the 2 contacts mentioned in step #3. Put it back on the cartridges, covering the same contacts it was covering before, and set them back in the printer. The same error message will appear.

Step #11:
Turn the printer off and move the ink cartridge carriage back to the center. Take them out while the printer’s still off and remove all the duct tape from the ink cartridges.

Step #12:
Install both duct-tape free ink cartridges on the printer and turn it on. The printer must be  working normally and you should be able to use the cartridges on a regular basis from now on.

If you have any problems repeating the steps found in this blog post, or it simply doesn’t work out for you, please post a comment in the section below this post and we will get back to you with other possible solutions and the necessary clarifications.

martes, 29 de abril de 2014

How to solve the 5400 o E26 error message on Canon printers

Canon printers are known for their high print quality and for having the highest page yield in the entire market. Some of their printer models go back three generations and are still using the same ink cartridges.

This printer has catched our attention as printe techs, and keeps us focused in finding the solution for every possible error that can show up on them, as many other people do online. When a printer has been sold as much as this particular model, this is bound to happen all over the Internet.

This specific error code can show up in different models of the Canon Pixma series, especially those that use PG210 and PG211 ink cartridges.

It can be appear when the contacts on your ink cartridges are overheating, a common situation after having them refilled and printing with very little ink in them. The contacts could also be dirty and keeping the printer from recognizing the ink cartridges installed in it.

Here are the possible solutions for the 5400 or E26 error code on Canon printers:

Before you begin any restoring procedure, please disconnect the printer’s power cable and leave it like this for at least ten (10) minutes.
cable power
cable power
This will keep the printer from processing data or getting electricity at all, stopping the overheating process that may be going on inside it. The contacts can now cool down and recognize the ink cartridges, starting a normal printing process. This is the first possible solution to this problem.

Another possible solution lies in cleaning the contacts both on the printer and on the ink cartridges.
ink cartridge 22 tricolor
Like we said before, this error message could also appear after we’re refilled our ink cartridges: they could be filling the contacts up with ink. If this is the cause, you can fix this problem by cleaning the print heads.
printer conector clear
You should also consider cleaning the contacts on the actual printer with a small napkin that has been damped in alcohol; it will dry up in no time. We don’t recommend you use water, since it can cause short circuits and burn the contacts on your ink cartridges.

Another possible fix for the 5400 or E26 error message:

The following restoring procedure for Canon printers is highly effective and we stand behind it. We’ve already tested it out on several other Canon printers with this same issue, and it has worked perfectly so far.

Procedure to restore the 5400 or E26 error message on Canon printers:

1. Turn your Canon printer off.
2. Press the Menu button, if you happen to have one.
3. Press the Scan / Copy / Scan keys in that order. You will now gain access to the Administrator Menu.
4. Once inside this menu, choose the NYRAM ACCESS option.
5. Select ABS-M Level 0.
6. Then, select the ABS-P Level 0 option.
7. Finally, press the Stop key to exit.

If things don’t go according to plan, please post a comment in the section below this post and we will be happy to get back to you with another possible solution for this problem. remember we’re here to help.

How to deep-clean print heads in your Epson printer

First of all, let us say the this post is called this way in order to englobe many printer models and help a lot of our customers at the same time.

It’s come to our attention that most Epson printers seem to have the same print head cleaning systems, which are very effective on their own. However, these consume a lot of ink, even more ink that it would take to clean them on other Epson printers such as the Epson L200 model.

The method we’re about to explain uses a bit more ink than the automatic cleaning process, since it takes the ink and pumps it through the print heads, just as it would when printing a document. This is why this procedure is so helpful.

However, Epson print heads can’t be easily reached and manipulated as ink cartridges can be, a major disadvantage for Epson printers.


This particular problem has already shown up on our device and we’ve been able to understand it, so all we need now is s solution for it. This lies on a cleaning process anyone can execute on their Epson print heads. Please keep in mind this post was made using an Epson L200 printer model, and that this method worked perfon it. Before it was done, the printer had deficient print quality, and even left letters out of the prints.

Deep-clean tutorial for Epson print heads:

Step #1: Click on Printing Preferences on your printer’s menu

You must first locate the printer the dirty print heads are on. In this case, we’re working on an Epson L200 printer model, but you can follow these same steps on your own.

So far, Epson hasn’t changed this deep-clean procedure, so we can count it for a while. Now you can click on Printing Preferences.
epson printer
epson printer preferences
Step #2: Browse the entire Printing Preferences window

This is the window you’ll see displayed on screen once you click on Printing Preferences; the options shown on it will depend on what printer model you’re using.

Please ignore all settings not available on your printer and just follow the steps we’re describing in order to clean the print heads on your own device.
this is the printing preferences menu for epson printers
Step #3: Click on the Maintenance option

Click on the option called Maintenance, or the proper word used in your own native tongue. We recommend you install your printer drivers in the language you speak more fluently.
This is what the Epson Maintenance menu will look like on your screen
maintenance menu will look like on your screen
Step #4: Confirm the deep-clean process on your Epson printer

Please clean the ink injectors before starting with this deep-clean process. after it’s been done, you can execute the cleaning procedure on your print heads by clicking on this option and waiting for the system to ask for your confirmation. It will also issue the warning we told you about in the beginning of this post.
check out the cleaning of the printer
Step 5: Wait for the deep-clean process to do its job.

After confirming the deep-clean request, we will only have to wait until the procedure is done, and hope to reach top print quality standards.

Remember your printer will fill the print heads up with ink to unclog them, just as it would when printing a document. You will also need to confirm the printing of a test sheet after this cleanse is done.
confirmation message you will get before printing the test sheet
Step #6: Confirming the print quality obtained in the test sheet.

If you haven’t reached the desired print quality in the first cleaning process, please repeat it until you do. The following picture shows what bad and good print quality looks like. If you need more information or this procedure doesn’t work out for you, please remember we’re here to help you.
print test page and check the results
This last window will ask you to end or repeat the cleaning process, depending on which of these print qualities you’ve reached in the first test sheet.

If you need help, you can contact us by leaving a comment in the section below this post, and we will get back you as soon as possible. Here is another post directly related to this one:
How to clean the print heads on Epson L200 printers.

lunes, 28 de abril de 2014

How to clean the print heads of your Epson L200 printer

As we all know, this is the latest Continuous Ink System printer model in the Epson brand. We were obviously naive in thinking Epson would go out of its way and provide their customers with a printer that’s convenient for them.

However, as time goes by and you continue to use your printer, you will start noticing this printer is more troublesome than it looks. Once you’ve printer 15 pages with it, the printer will say it needs to have the inner sponges replaced, which will cost you about $30.00 if you choose to go along with it.

We can now proceed to show you to unclog the head prints on this particular printer. Be very careful when using dyed inks that are sold in printer stores, since these printers actually use pigmented ones. You can learn the difference between them by reading this post.
If you want to refill your cartridges instead by using the ink bottles sold by Epson, please read this post where you’ll be able to find the restoring codes you’ll need to install them on Epson L200 printers. that we know a couple of things about the Epson L200 printer, let’s learn how to clean and refill the print heads.

How to clean and/or unclog the print heads on Epson L200 printers with ink tanks:

This procedure will show you how to clean these print heads by hand. Now, let’s start with the first step.
head clear printer
button printer epson
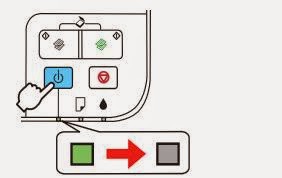
1. Turn your printer off. Do not disconnect the power or USB cables, just turn the device off by using the appropriate button.

As you can see in the last image, you must press the On/Off button, which will make the LED indicator go from green to black. This is the first instruction you must follow to clean your Epson L200 print heads. If you have any problems with this, please post a comment in the section below this post and we will be glad to get back to get.

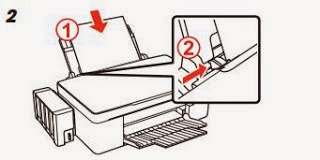
2. Please put some paper sheet sin the paper tray; the printer will need them to print the sheets necessary for the cleaning process. If you don’t reach the desired quality levels in this first process, you you will need to do it up to 5 times.
paper int he printer epson
paper in the printer epson
3. You must now ask the printer to clean or unclog the print heads on your Epson L200 printer by pressing the On/Off and Resume/Cancel button simultaneously. Please take a look at the following picture.
button
head printer epson
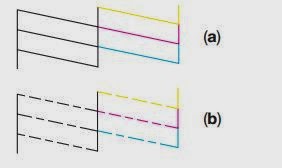
We must do this exactly as it’s shown in the picture: press the Resume/Cancel button first, and then the On/Off one. Take a look at the test sheets that will come out of the printer. They must look like the first example in the next picture.

If it looks like the second one, keep doing these tests until you reach high print quality.
print head test
head print test
These examples are just a sample of how to rest of the documents or images produced by your printer will look. You can repeat this process without harming the printer in any way.

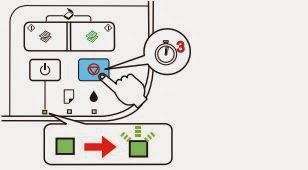
4. Press and hold the Resume/Cancel button for 3 to 5 seconds. In this case, the green LED indicator will start blinking, letting us the printer is in the middle of something.
print circle reset
print reset circle
5. Once this LED stops blinking, it will shine steadily once more. You can now turn the printer off. This entire process shouldn’t take more than 10 seconds, but it could do it all the same. Please wait until the print heads have been cleaned completely.
print button off
print off button
If you still can’t reach the print quality you’re looking for, please repeat this process until you do. If you’ve already done this three times and the results are still displeasing, then execute the Deeap Cleaning Process installed with your printer’s drivers.

How to solve the 1687 error code on Canon MP230 printers - the FINE ink cartridge hasn’t been installed properly

Canon MP230 printers are now being sold all over Latin America, and will take the place of other Canon Multifunction printers for many days to come in the region.

These printers can have Continuous Ink Systems installed in them, but its printing quality’s only average when comparing it to the Canon Pixma MP280 printer model. It also lacks a built-in screen, so we can’t select the exact amount of copies we want to have made directly on the printer. Unfortunately, this particular option seems to have been discarded by Canon.

One of the most common issues on this printer is the 1687 error code, which claims “the FINE ink cartridge is not installed properly.” This means your Canon Pixma MP230 printer isn’t recognizing the ink cartridge at all.

When we say FINE ink cartridges, we’re talking about the PG210 Black and PG211 Tricolor ones, which is the exact type of cartridge used on Canon Pixma MP230 printers.Some other high yield ink cartridges are included in this category, such as the CL210XL Black and CL211XL Tricolor ink cartridges.

How to solve the 1687 error message on Canon Pixma MP230 printers

First of all, the LED indicators on your printer will be blinking like this:
blinking lights on a Canon MP230 printer with the 1687 error code
We already know there’s a problem going on in our printer, so now we need to find a solution for it., If we use logic, we will be able to deduce there’s something wrong with the ink cartridge contacts, possibly caused by an ink spill on them.

Please keep in mind this particular error code is very rarer on printers where the ink cartridges haven’t been refilled. If you’ve only been using the printer for a short while, contact the seller or manufacturer so you can take advantage of the warranty on this  Canon product. 

If you have refilled your ink cartridges and used your printer for a while, then you may need to clean the contacts on your cartridges: they could have become dirty after a bit of ink spilled and dried on them. You can learn how to clean them by reading our post How to clean the contacts on your ink cartridge. To simplify this post, proceed to clean the contacts with a napkin or soft cloth dipped in a bit of alcohol.
ink cartridge hp 122
ink cartridge color
We also recommend you clean the contacts on your printer, since they could also be covered in dried ink and contributing to the ink cartridges not being recognized. Here’s a picture of how they look; please remember to clean them using a soft material such as s napkin or piece of cloth.
conector in the printer
Clean the contacts on your printer with even more delicacy than the one you used to clean the ones on your ink cartridges. You must leave the cartridge carriage intact and in place to avoid damaging them. We suggest you clean this contacs from the top down.

After you’ve cleaned both sets of contacts, install the ink cartridge back in your printer. Do not touch the contacts or ink injectors at any moment to keep them clean.

a. These are the ink cartridge contacts. Please avoid touching them to keep them clean, or you will have the same problem again in the future. Remember we’re cleaning the contacts to get rid of any residue on the cartridges that may be in the way of the contacts.

b. These other pieces are the injectors. Stay away from them, since they’re very fragile parts and are in charge of putting the ink on the paper sheets. If these are clogged, your FINE ink cartridge could start printing random lines on your documents.

Now we can place the ink cartridges back in the printer, or at least the one that’s causing this error message. The printer must recognize the ink cartridge and be able to print with it. Press the ink cartridges down with a bit of strength to help them get in touch with the contacts on the printer.

After this entire procedure has been done, turn your printer off and disconnect the power exit. Wait for about 5 minutes  and reconnect the printer before you turn it on. If you have any problems during this process, you must only remove the ink cartridges from the printer and set them back in place one more time.

Once the FINE ink cartridge has been installed, leave it inside the printer and keep it safe. If you fail to do this, the FINE ink will dry out and won’t work properly until you’ve reinstalled it. Keep using this cartridge for up to six months after the installation date to guarantee maximum print quality.

Troubleshooting program for your printer

This post has been created for all those users that work with Windows OS on their printers, and includes a very useful program that can help you detect any error on your printer’s drivers and set everything straight. This helpful little program is called WIndows Fix It.

Windows Fix It will help you solve the most common printer issues out there, such as paper jams that remain set in your printer’s memory even after they’ve been dealt with.

It’s very easy to install: you will only need to download and execute a single file, which will only take a minute depending on your Internet connection. To obtain better diagnostics, please Install Internet Explorer 9 on your computer.
Please select Windows Printing Problems on the program’s menu to access step-by-step tutorials to solve common printer noise problems.

You could also try to install and run another troubleshooting program on your computer to get rid of these common printer issues.

We will now show you how this troubleshooting program should run on your PC. This particular software doesn’t discriminate brands or printer models, and will identify and solve minor issues on your printing devices.

To download Windows Fix It, please click on the following link:

Download link for the Windows Fix it troubleshooting software.
You can start reading about the execution process once you’ve installed this program on your computer.

Once you download and run this program, this is the first program that will appear on your screen. It will run smoothly most of the time, but it could have problems with your antivirus depending on the version you’re using.
microsoft fix it
microsoft fix it
We will know try to show you the entire process and teach you how to reach a solution for any problem that may occur on your printer, or at least suggest a possible fix.

If you have any doubts, don’t hesitate in leaving a comment in the section below this post. We’re glad to help you figure this out.

The first option is detecting and reviewing printer problems on your own:

This option will allow the printer to search the entire printer that’s having all these printing issues. In this way, the troubleshooting program will be able to identify each particular problem and ask us if we wish to accept the solution it’s proposing, or just give us a possible fix to this issue and not execute it.

The second option is to let the program detect and solve all problems by applying its own procedures:

windows
print fix it
In this case, the troubleshooting program will start a review process on its own and start applying the solutions it considers appropriate. However, we don’t recommend this method, since the program can choose to fix other minor issues instead of the main one that’s led you to using it.We suggest you choose the first option and stay with it.
what is the printer solution
printer model
The next step consists in selecting the specific printer that’s causing all this trouble and find a solution for the issue. The printer will display all the printers installed on your computer, so you must be sure of which of them is having some problems and be able to find a proper solution for them.
printing solution
fix it

This is the form where you’ll have to select which printer is having problems

After choosing one particular printer, the problem will examine it and search all over this device for common printing issues such as paper jams, diver malfunction or missing printer parts.

This will now appear on our computer’s screen:

The solution for these problems should appear on screen. In some cases, you will be redirected to Microsoft’s website, where you’ll be able to find a solution to any specific printer issue.

Even when this is a very helpful tool in solving common printing problems, you could also need to have a tech take a look at your printer and check for any physical problems in it. Please do not discard this option once you’ve downloaded Windows Fix It.

----
All the pictures found on this blog post have been taken from a Windows program. All logos and images are copyrighted material, and we’re only using them to illustrate a point.

How to restore Epson TX100 and TX105 printers

Restoring Epson TX100 and TX105 printers takes a bit of work, and you will need to downloading this specific adjustment program. Run this program on your printers by clicking on the software.exe file in the downloading folder.

Both Epson Stylus TX100 and TX105 are Multifunction printers have been designed to read top print quality standards in all their prints, scans and copies.

This particular Epson printer can yield up to 5760dpi with variable ink droplet technology, and a printing speed of 26ppm (pages per minute) for Black text, and 14ppm for Colored text printed on A4 paper sheets.

You can now restore the Epson TX100 and TX105 printer models by following these steps:

1. Run the program by clicking on the Loader.exe file. It won’t need to be installed on your printers or computer.

Please click on the Accept button, and then proceed to select your printer type on the upcoming menu, which will only include the Epson TX100 and TX105 models. Press OK after choosing and click on t Particular Adjustment Mode option.


Remember we’ve already tested this program out and didn’t have any issues with it. However, we could be using different antivirus on our computers, so please remember to disable them just for a few minutes if they’re causing any problems during the installation process. You can also contact us by leaving a comment in the section below this post.
particular adjustment
particular adjustment program
2. Click on Waste Ink Pad Counter on the maintenance menu displayed on your computer’s screen, and then click on OK.
reset printer epson program adjustment
adjustment
2. Click on Waste Ink Pad Counter on the maintenance menu displayed on your computer’s screen, and then click on OK.
waste ink pad counter
Just pay using Paypal U.S. $ 3.00...

Note: We can’t guarantee this program won’t cause any damage to your printer or computer, since we’ve only talked about the restoring process in this post. We will not be held accountable for any harm that may come to your printer.

How to restore Epson TX121, T14 and T1100 printers

After waiting for a long time and searching all over the Internet for these programs to restore TX121, T13 and T1100 printers, we’ve finally found them and tested them out. Getting to them was a very difficult task.

Of course, anything’s possible, so we found the Epson 1100 resetter on Eidoreset, and the T13 and TX121 ones on Mediafire, uploaded by an user called OrTHoTaMiNe.

We’ve already tried out all of these programs on our computers and haven’t had a single issue during the installation process. Our computer’s antivirus didn’t seem to have a problem with it either, but we suggest you deactivate it for a couple of minutes on WindowsXP, Windows7 and Windows Vista, just in case this software has some issue with your antivirus.

Restoring printers, especially Epson ones, is a very important procedure. These particular printers work very well with Continuous Ink Systems, since their ink cartridges lack the traditional inner sponges and you will only need to refill them with the amount of ink you’ve spend over time.

Epson printers are also known for their high print quality in colored prints due to their use of pigmented inks. This specific product has a very strict elaboration process.


We recommend all our readers to post a comment on the section below this post if you come across any problems during this entire tutorial. We will be glad to help you solve your problem.

Here is a screenshot of how the restoring program looks on screen:
reset printer epson tx121 waste ink pad counter

Here are the direct download links of the restoring programs for Epson T13, TX121 and T1100 printers:


Remember if you have problems leave a comment will be gladly answered.

How to restore the chips found inside Canon ink cartridges

Canon ink cartridges tends to use small ink cartridges that have chips installed in order to guarantee the best functioning possible. However, the Canon chip is also responsible for monitoring ink usage on any printer letting the user know when to change an ink cartridge. This chip is also meant to keep us from refilling our ink cartridges and buying new ones.
cartridge canon
canon cartridge chip
Our printers could ask for new ink cartridges when the ones installed are more than half full, so we will need to restart our printer to get it to use the ink inside the cartridges that have already been installed.

Now that we’ve achieved restoring these ink cartridges, we can push our cartridges to the limit, whether to refill them or to get the amount of ink we deserve.

Instructions to restore the chips found inside Canon ink cartridges:
Your printer’s USB cable must be disconnected.
1. Turn the printer off by pressing the On/Off button. Wait until the LED indicator turns off as well.
button to turn the printer
2. Disconnect the printer’s power cord and remove its USB cable from the computer it’s attached to.
canon printer usb cable
cable usb printer
3. Locate the Resume and On/Off buttons on your printer’s panel, found on the upper-right section. now, press and hold them down.

Press this buttons at the same time so this restoring method works out. If you need more information about this step, we’ll be glad to help you out. Once these buttons are pressed down, hold them for about 20 seconds and don’t let go of them until this amount of time has passed.

4. Connect the printer’s power exit so it can get going. Let go of the On/Off button while keeping the Resume one pressed down. This will put your Canon printer in Test Mode.

5. You can let go of the Resume button once you’ve noticed the printer has started printing the test sheet. The printer will now be in Service Mode and the screen’s light will go off.

6. Press the Continue button once and wait for the ink counter to show up on the printer’s screen. Do this four times in case the message doesn’t appear on your first try.

7. Press the 0 key on your printer to restore the chip inside the ink cartridges. If you’re using a bubble-jet printer, press the Cartridge key instead.

8. Press the OK button and turn the print off again.

9. Disconnect the printer from the power exit and plug it back in before connecting the USB cable back to it so you can start using your printer again.

How to reset the Canon IP1880 printer

Canon IP1880 printers are known to have show many different error messages, such as ink tray spills, frozen software, the inability of reading your ink cartridges’ ink levels and paper jams.

At some point, and for a variety of reasons, you will need to restore this printer to get it working again.

Fortunately, this is something you can do on your own without having to call a printer tech, and it will help you save a bit of money.

This restoring procedure has been tested out and it has worked perfect on Canon IP1800 and IP1900 printers, among other models in the Canon IP series.
canon pixma MP280 printer

Instructions for resetting your Canon IP1800 printer:

1. Press and hold the REsume button on your printer for 2 minutes and let go of it.

2. Gt the printer’s cover open, remove the company-manufactured ink cartridge and replace it. Put the cover back on the printer and keep it in its locked position.
3. Turn the printer off by pressing the Power key. You can now disconnect the printer’s power cord and leave it unplugged from 30 seconds to 1 minute. Plug the printer back and press the Power button again to turn it back on.
close printer
close printer
Please remember we’re here for you in case this procedure doesn’t work out. You must only post your question in the comment section below this post and we will get back you right away.
press the power button
The original idea behind this post was extracted from a post we found on Ehow, which was later translated. The source can be found in the following link: How to reset Canon IP1880.

How to replace Canon ink cartridges

We think it’s very important you know how to change the ink cartridges n your printer. This may take a bit of practice, but it’s something you need to be familiarized with.

Please follow these steps to replace the ink cartridges of a Canon Inkjet printer.

Instructions:

1. Choose an ink cartridge that’s compatible with your printer mode. Canon ink can be versatile, so you may have to choose between Black ink cartridges, Colored ones  or packs that include both colored and black ones.
the on/off button on a Canon printer
2. Turn your Canon printer on. The On/Off button can be found on the upper-right side. Now, open the printer’s lid.
a picture showing you how to open the printer’s lid
3. Get the lid open. This tutorial has been made for Canon printers that use two (2) ink cartridges, which cover about 92% of Canon printer models.

4. Wait a minute. The ink cartridge carriage will stop automatically.

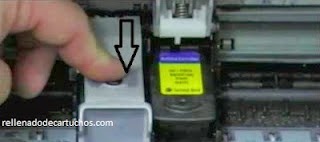
5. Put your hand behind the current ink cartridge and pull it towards you until it pops out. You can now choose to refill or discard it.
remove ink cartridge canon
this is how you should pull on the ink cartridge so it comes out
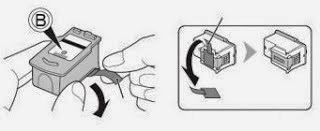
6. Remove the ribbon on the new ink cartridge.
remove the protective connector on the cartridge
7. Put the new ink cartridge inside the printer. Make sure it’s been set in the right position.
again place the cartridge into the carriage
8. Push the carriage softly until it fits in its proper place. Some ink cartridges hae indicators that willlet you know if they’ve been placed properly.

9. Close the printer’s lid and print a test sheet to make sure everything’s working perfectly.
close the door giving access to the cartridges
If your printer needs to be restored in any way, we recommend you read these more global posts regarding Canon printers:

How to restore Canon printers
Error codes for modern Canon printers

If you have any questions, please contact us by leaving a comment in the section below this post. We’re here to help and will answer back shortly.