As we all know, this is the latest Continuous Ink System printer model in the Epson brand. We were obviously naive in thinking Epson would go out of its way and provide their customers with a printer that’s convenient for them.
However, as time goes by and you continue to use your printer, you will start noticing this printer is more troublesome than it looks. Once you’ve printer 15 pages with it, the printer will say it needs to have the inner sponges replaced, which will cost you about $30.00 if you choose to go along with it.
We can now proceed to show you to unclog the head prints on this particular printer. Be very careful when using dyed inks that are sold in printer stores, since these printers actually use pigmented ones.
You can learn the difference between them by reading this post.
If you want to refill your cartridges instead by using the ink bottles sold by Epson, please read this post where you’ll be able to find the restoring codes you’ll need to install them on Epson L200 printers. that we know a couple of things about the Epson L200 printer, let’s learn how to clean and refill the print heads.
How to clean and/or unclog the print heads on Epson L200 printers with ink tanks:
This procedure will show you how to clean these print heads by hand. Now, let’s start with the first step.
 |
| button printer epson |
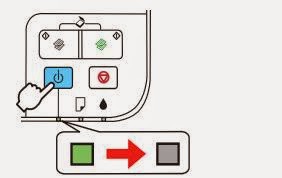
1. Turn your printer off. Do not disconnect the power or USB cables, just turn the device off by using the appropriate button.
As you can see in the last image, you must press the On/Off button, which will make the LED indicator go from green to black. This is the first instruction you must follow to clean your Epson L200 print heads. If you have any problems with this, please post a comment in the section below this post and we will be glad to get back to get.
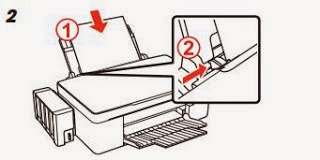
2. Please put some paper sheet sin the paper tray; the printer will need them to print the sheets necessary for the cleaning process. If you don’t reach the desired quality levels in this first process, you you will need to do it up to 5 times.
 |
| paper in the printer epson |
3. You must now ask the printer to clean or unclog the print heads on your Epson L200 printer by pressing the On/Off and Resume/Cancel button simultaneously. Please take a look at the following picture.
 |
| head printer epson |
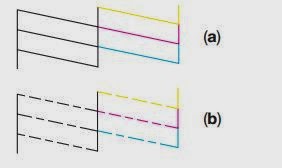
We must do this exactly as it’s shown in the picture: press the Resume/Cancel button first, and then the On/Off one. Take a look at the test sheets that will come out of the printer. They must look like the first example in the next picture.
If it looks like the second one, keep doing these tests until you reach high print quality.
 |
| head print test |
These examples are just a sample of how to rest of the documents or images produced by your printer will look. You can repeat this process without harming the printer in any way.
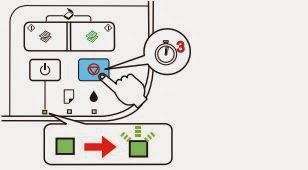
4. Press and hold the Resume/Cancel button for 3 to 5 seconds. In this case, the green LED indicator will start blinking, letting us the printer is in the middle of something.
 |
| print reset circle |
5. Once this LED stops blinking, it will shine steadily once more. You can now turn the printer off. This entire process shouldn’t take more than 10 seconds, but it could do it all the same. Please wait until the print heads have been cleaned completely.
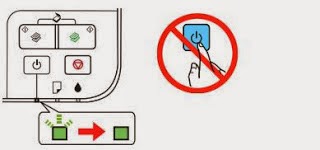 |
| print off button |
If you still can’t reach the print quality you’re looking for, please repeat this process until you do. If you’ve already done this three times and the results are still displeasing, then execute the Deeap Cleaning Process installed with your printer’s drivers.


No hay comentarios:
Publicar un comentario